So that should be a good indicator that if I can do this under pressure and have it turn out okay, so can you! And since we are so far along in the bee, you probably will see the same steps here that everyone else has done, just for this slightly different block. I love the skinny points on this one.
*And a quick disclaimer - because I've never done this before I may do things in an unconventional way, but we can just add this to my {not a tutorial} list and remember that it's just the way I did it. :) And I'm afraid maybe I didn't take the right pictures...but for me this is sort of one of those things that you just have to start doing and then it makes sense!
I started by printing off my pattern pieces for block 2 (all of the blocks in the quilt along can be found HERE) and cutting some rectangles of my two fabrics. 8 blue and 9 white for the points. When I printed out my pattern the 1 inch mark was slightly shy of an inch, but I couldn't figure out how to scale it, so I just left it alone. The finished block ends up being around 7 inches for my print out.
The rectangles I cut were about about 1/2" bigger on each side than the widest point of the point. I figured a little more waste than I was used to was better than having to redo it because my pieces weren't big enough.

I liked to open the fabrics before I sewed the together to make sure I had them in the right order and in the right position.


Here you can see how it was flipped open as I added a strip of white to create the point.


Here's what it looks like after I trimmed the seam allowance and pressed it open. And can you see how the shadow of the white doesn't fill in all of space 3? Yep! Major goof!

I had to take it out and redo it. The piece of white was long enough I just didn't angle it properly. So as you alternate back and forth you have to angle your pieces parallel to the stitching line so that when you fold them open you have enough to fill in the space. Like this.

So then to finish the fan I kept adding blue then white then blue, in the manner above,


After the first 3 or 4 points, it really starts to make sense. This is what your paper will look like when you are done stitching.

Next, cut out the inner circle pieces.

Fold them in half and press to find the midline.

Pin the sections together starting in the middle and then on each end and then as much as you feel you need to keep the edges together. This is what this side looks like:


Next, find the centers of each piece and start pinning together. Line up the edges next and just work to get the edges all lined up.

And then pin the dickens out of it! See how it curves up? That's the side you will sew on.

Next you will cut out the two pieces which you will sew to the top of the fan and complete the square. I used one pattern piece and folded my fabric to cut two pieces at once.

Sew these two pieces together at the fattest part to form the curve. Press. (I press to the side, but you can do what works for you.)

Again, find the middle of each section and pin. The pin the edges together lining up the sides.

And then pin it some more. The curve allows the fabric to stretch and have a little more movement with the bias. This seam is actually easier because the pieces are bigger. I like saving it for last!


And here is what a clipped seam allowance looks like! It just helps the curve lay flat for pressing. So clip your seam allowance...

And then press it open!
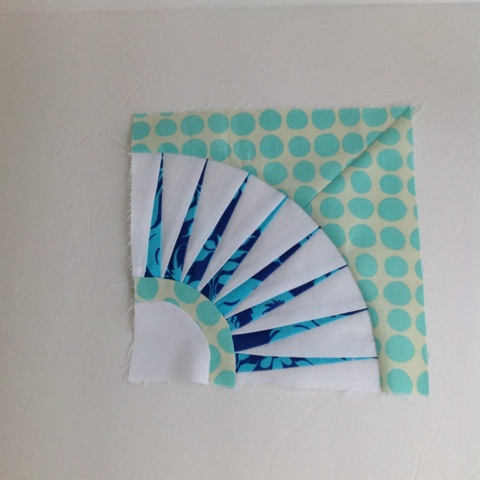
Fabric is Amy Butler Lark (the dark blue) and Sunspots from LOVE (dots).
Maybe one day I really will have a quilt like my mom's!
So next week is the last Monday for the Quilt Along! You can check out all of the other tutorials at the following links:
March 5 - Kim from My Go-Go Life {Week 1 Block 0}
March 12 - Sara from Sew Sweetness {Week 2 Block 5}
March 19 - Megan from Canoe Ridge Creations (Week 3 Block 1}
March 26 - Kati from From the Blue Chair {Week 4 Block 8}
April 2 - Jeni from In Color Order {Week 5 Block 7}
April 9 - Amy from Sukie Don't You Know Who I Am? {Week 6 Block 6}
April 16 - Katy from The Littlest Thistle {Week 7 Block 3}
April 23 - Lee from Freshly Pieced {Week 8 Block 4}
Happy Sewing!!
10 crafty mcCrafters commented:
Thanks for the {not a tutorial}. The tip for using your iPad is great. I always struggle with holding up my paper to a window, to have it all shift before I lay it back down. Your teeny points came out perfectly!
This is looks incredibly fun! I can't wait to try.
Your block is fantastic!!
It looks great, well done! Although I'm not sure Apple will ever be advertising that as a selling point for their iPads ;o)
Those are some pretty perfect looking points there, Missy! Well done
Hi!
Great job on your first paper-piecing venture...to try curves on your first try is amazing!
When I first tried paper-piecing, I got so frustrated at how I couldn't figure out the backwards and size of the patches-problem. I searched and found Peggy Martin's "Quick-Strip Paper-Piecing" book. She has a New York Beauty in the book, and clear pictures and helps. This paper-piecing method is a must-have!!! I now really, really enjoy paper-piecing because of this book, and I share it with everyone! ABSOLUTELY no guessing with "how big do my patches need to be???" because you don't cut patches....just strips! And she tells you how to adapt her method to other patterns, which I use for all the paper-piecing I do! Peggy even offers her method as a Craftsy online course now !!!
That is a gorgeous block! I might be too intimidated to try it! you explain things so well, sooo maybe I wilL :) thanks!
great block - amazing what we can do under pressure :) oh, and I just got your bloggers choice fabrics this week - fabulous choices thanks so much :) I love millie's closet !
Looks awesome!
This is way beyond my skills right now, but I really enjoyed seeing how to do this and I have bookmarked it for future reference.
Post a Comment